Paloma Customers API
Updated: 13.12.2024 14:16
The Paloma Customers API defines endpoints for customers, users and orders operations.
https://[organization].paloma.one/api/customers/v2
Customers and Users
The Paloma Customers component distinguishes between customers and users. A Customer being the person or entity that has a busines relationship with the shop operator and the User being the person or entity
that is using the shop.
Each user is assigned to a customer. For B2C shops, Paloma assumes a 1:1 relation between a user and a customer by default. For B2B shops, a n:1 relation is common.
Creating a Customer
Create a new customer and user account. The email address will be used as identifier within the channel.
POST /{channel}/customers
{
  "emailAddress": "hans.muster@astina.io",
  "firstName": "Hans",
  "lastName": "Muster",
  "user": {
    "password": "banana"
  },
  "locale": "de_DE"
}
User Authentication
After a customer is registered, we can use the authentication method.
POST /{channel}/users/authenticate
{
  "username": "hans.muster@astina.io",
  "password": "banana"
}
The return value is an authentication token:
{
  "user": {
    "username": "hans.muster@astina.io",
    "id": "12324-3434-3434"
  },
  "customer": {
    "customerNumber": "10001",
    "emailAddress": "hans.muster@astina.io",
    "locale": "de_DE",
    "firstName": "Hans",
    "lastName": "Muster",
    "id": "43435-6565-6565",
    ...
  }
}
If authentication is successful, your application is supposed to keep the returned authentication token in session. If you use a framework that provides a security component (e.g. PHP/Symfony), it is advised to integrate this API call with your security component.
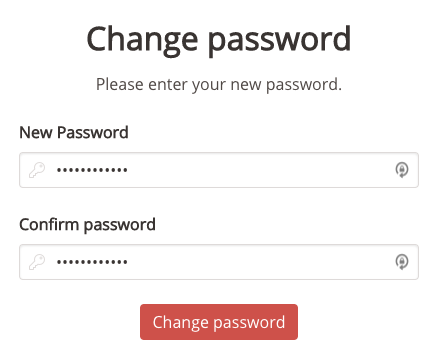
Changing the User's Password
To change a user's password, the "Update password" operation can be used.
PUT /{channel}/users/{userId}/password
{
  "currentPassword": "banana",
  "newPassword": "pineapple"
}
If the user cannot provide the current password, the "Password reset" process can be used.

Start the password reset by providing the user's email address and a confirmationBaseUrl.
POST /{channel}/users/password-reset
{
  "emailAddress": "hans.muster@astina.io",
  "confirmationBaseUrl": "https://mywebshop.com/security/password-reset"
}
The confirmationBaseUrl needs to contain a link to your shop front-ends password reset view. A confirmation token will be appended to this URL to be included in the confirmation email sent to the user
(e.g. https://mywebshop.com/security/password-reset?token=YZCgyBXCkk9...).
Once the user hase received the confirmation email and clicked on the link, the shop front-end should provide him with a form where the user can enter the new password.
After that, you can use the new password with the token to change the user's password.
PUT /{channel}/users/password-reset/{token}/password
{
  "password": "pineapple"
}
Customer Addresses
Each customer has a list of addresses. The Customer API CRUD methods to manage those addresses. Each CustomerAddress has a type: contact, billing or shipping. This type shows the purpose for which the address is normally used. The defaultAddress property shows which address is set as the default address for each type.
GET /{channel}/customers/{customerId}/addressbook
See the Customers API Reference for details.
All customer addresses also come with a unique ID which can be used in the Checkout API to set the billing and shipping address (instead of passing a whole address object). See the Checkout API Reference for details.
Order History
Purchased orders for a customer can be accessed using the "List customer orders" operation.
GET /{channel}/{locale}/customers/{customerId}/orders
This returns a paginated list of the customer's orders, sorted by orderDate in descending order by default.
{
  "content": [
    {
      "id": "12345678-9012-3456-7890-123456789012",
      "orderNumber": "123",
      "channel": "CH",
      "orderDate": "2018-03-14T10:07:26.000+0000",
      "locale": "de_CH",
      "status": "shipped"
      "items": [
        ...
      ],
      ...
  ],
  "totalPages": 1,
  "totalElements": 2,
  "last": true,
  "first": true,
  "size": 20,
  "number": 0
}
See the CustomersOrders model for more information.
Find Items that are Purchased Together
The "Get items purchased together" API operation returns a list of order item codes (along with an occurrence count) which are found in existing orders, for a given item code.
The returned item codes can then be used in the catalog API to fetch products which are currently available. By default, the item code contains the product item number. So to fetch "purchased together" products for a certain product, that product's item number can be used as the itemCode parameter in that method.
With the result a request to the catalog API can be made to find the appropriate products (see "Search products" in the Catalog API). However, depending on the Paloma configuration, the item code can contain other identifiers like a short number. Contact Paloma support if you don't get the expected results when calling this method.
Payment Instruments
Payment instruments for a customer can be accessed using the "List payment instruments" operation.
GET /{channel}/{locale}/customers/{customerId}/payment-instruments
This returns a list of customers' payment instruments.
[
    {
        "id": "01E4V2JCC9T33QXEAXPHCJEC4F",
        "type": "Mastercard",
        "maskedCardNumber": "513659xxxxxx5354",
        "expirationMonth": "12",
        "expirationYear": "24",
        "expired": false
    },
    {
        "id": "01F5V2JD49T33ZTEQXPVCJZC08",
        "type": "VISA",
        "maskedCardNumber": "476325xxxxxx7800",
        "expirationMonth": "05",
        "expirationYear": "19",
        "expired": true
    }
]
A payment instrument can be removed using the "Delete payment instrument" operation.
DELETE /{channel}/{locale}/customers/{customerId}/payment-instruments/{paymentInstrumentId}
Watchlists
Watchlists are lists of items (SKU-level) together with product unit and quantity. Customers can create different watch lists and maintain product lists for different purposes.
The primary API operations for watchlists are:
- List all of the user's watchlists
- Create a new, empty watchlist
- Add watchlist item
- Update watchlist item
- Remove an article from the watchlist
Watchlists Import/Export
Watchlists may be imported and exported using Excel files. Such an Excel file may contain multiple watchlists, each on a separate sheet. This is useful for bulk operations on watchlist contents.
The format for watchlist Excel files can be configured on a per-project basis. The default format has the following structure:
Sheet name: 'Example watchlist'
| SKU | Product name | Quantity | Unit |
|---|---|---|---|
| 00014686-330-15-56 | Sneaker | 2 | PCE |
See the Watchlist Export/Import API reference for further information.
Access Requests
For B2B shops, it is common that one customer does not correspond to an individual, but to a company. For these organisational customers multiple user accounts with different roles may be created. Each of the users can then log in with their own e-mail address and password and act on behalf of the customer within their granted permissions.
Existing users (with the correct permissions) can create additional users manually in the Paloma Cockpit. Furthermore, Paloma has a facility called "Access Requests" to create users. For this, users enter their user data and request access to a shop or customer and Paloma autonomously, admins, or customer admins can approve or reject the request.
The approach is advantageous for administrators who want to create multiple user accounts. The burden of entering the correct data is shifted to the users. Furthermore, with this method it is possible to create user accounts without knowing which or how many user accounts are needed beforehand. Furthermore, the system covers the use cases of generating and handing out registration codes, and of allowing automatic or semi-automatic registration for users with a specific e-mail address patterns.
The following sections describe the Access Requests system.
Access Request Life Cycle
The life cycle of an Access Request starts when a user requests access through the portal.
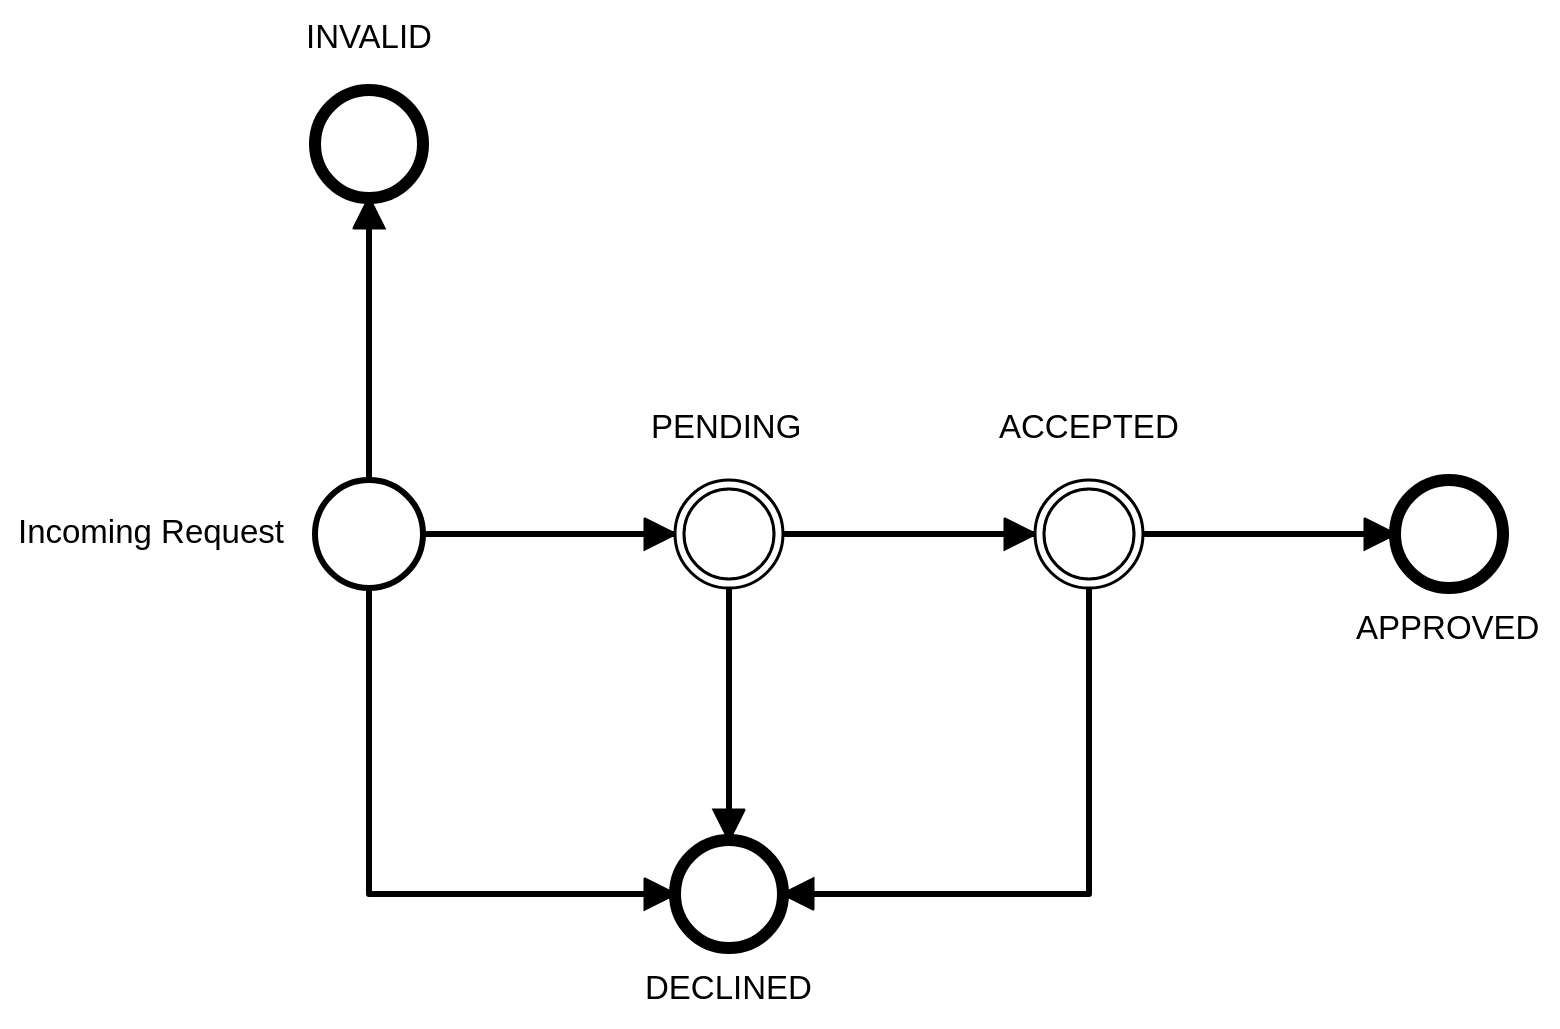
There are three steps to an approved user:
First, the Access Request is Pending, that is, Paloma received it, and it was valid.
Pending Access Requests are screened by Admins and attached to customers. At this step, the Access Request is Accepted.
Then, customer admins screen the Access Requests that have been accepted into their Customer. If they approve of an Access Request, it becomes approved. Paloma creates a full-fledged user.
The states Pending and Accepted can be skipped under some circumstances. For example, if Paloma can determine, that a Request is valid based on the e-mail address or a given Request Code, the request can be approved immediately.
Admins can decline a request, if they deem it incorrect or faulty, in which case the Request becomes Declined. If a Request is invalid, Paloma sets it to Invalid.
Terminology
- Request code: a code that a user can use to get automatically accepted into a customer.
- Accept, Auto-accept, Accepted user: An accepted user that has been screened and accepted by the client admins and added to a customer. A user that has been accepted, but not yet approved, cannot login.
- Approved, Auto-approve, Approval, Approved user: An approved user that has been screened and approved by the customer admins. The user is fully featured and can log-in.
Client admins accept requests
In the simplest case, the client admins (not customer admins) accept and approve an Access Request and Paloma creates a user. For this, the prospective user fills the form with their data. The client admins get notified and screen the incoming Access Request in the Cockpit (Customers -> Access Requests). There, the client admins have to find the correct user for the customer, assign the customer the needed roles to accept and approve it. If the Customer does not exist yet, it needs to be created beforehand. The system is not designed to create customers.
Client admins can decline a request and give reasons for that. The user is informed accordingly.
Auto accept using e-mail or request code
Paloma has the capability to accept request automatically under certain circumstances. For this, admins can create "User Invitation Symbols" for a customer (in the Cockpit, under Customers select a customer, then see "Access Settings"). A User Invitation Symbol is either an e-mail TLD, or a Request Code. If the prospective user has an e-mail address with the correct domain, or if the prospective user gives a valid Request Code, Paloma accepts and possibly approves the Request autonomously. Access can be granted immediately.
Next: API Model Reference